
![]()
![]()
![]()
![]()
![]()
![]()
|
|
||||||||||||
 |
||||||||||||
| chapter
five |
||||||||||||
|
We then proceed to cover how a tutor system is relatively painlessly integrated into the MIVI system, from an abstract DFSA form. |
||||||||||||
| 5.1 receiving MIDI | ||||||||||||
|
Just as with waveform data in an effect, MIDI information is passed to the plugin via a buffer, taking the form of an array of VstEvents, of which we are interested in those of type VstMidiEvent. A function, aptly called processEvents() (code ref. 30) is then called at regular intervals, by the host, to process the incoming data. In this function, we simply iterate through the events in the buffer and, for MIDI events, extract the MIDI message’s constituent components: the status byte and the first two data bytes. For our purposes, we are interested in solely the Note On and Note Off messages, and we catch these by checking their respective hexadecimal codes, given in the standard MIDI specification [31], against the status byte. We then assign the filtered result to a temporary variable, status. The variable channel is also set using the bits from the status byte, and represents the MIDI Channel of the incoming message. All other MIDI events are implicitly filtered out in the ensuing switch statement. Although the data bytes can, in general, represent anything from pitches to instrument numbers, depending on the event, in the case of our messages, the first two data bytes will always represent the pitch and velocity of the note, and are assigned to the local variables note and velocity, respectively. In these real-time processor functions, quick execution and prompt return are essential to maintaining the real-time integrity of the system. For this reason, and because the captured information is of use to multiple processes, the data, following a little filtering, are simply stored in a global array variable, notes, enabling their asynchronous communication [6] to such processes, as they require the information. The variable notes is an array of type note, indexed by pitch. The subscripts, however, are re-calibrated from the VST default, by a factor of -12. This is because VST caters for instruments that go below the typical instrument dynamic range – denoted to the user, in Cubase, as negative octave numbers. Not only does this calibration legalise the subscript range in C, as negative references, were they to compile, would result in potentially dangerous memory accesses, but also allows us to marry our offsets and octave numberings, in MIVI, with that in the music texts listed in the biography. Note, that the potential occurrence of the ultra-low pitches prompts us to guard against the potential for illegal offsets. |
||||||||||||
|
representing |
The note type (code ref. 04) consists of two components – velocity and status. Intuitively, the velocity component represents the MIDI velocity of the note denoted by the subscript of the array. Although the velocity component is dimensioned as a 32-bit integer, throughout the rest of our implementation, it will be treated as though it had only two states, zero and non-zero, ordinarily expressible by a 1-bit Boolean variable. To represent, to the user, the pressures, velocities and similar directions, entailed in the instruments’ handling, it was envisaged that explicit or implicit display of these values (using a gradient highlight, for example) would be helpful. In the context of our piano and, more notably, our flute, this would only serve to clutter the display, making it less intuitive to the learner. Incidentally, a gradient highlight would also conflict with the hard-edged highlight system employed in our tutor system, discussed in the next section. We, nonetheless, retain the ability to track note velocities, pending the possible discovery of a shrewder method of presentation or the potential for use in the context of other instruments, and also to illustrate the principle to the reader. The status component is of use in MIVI’s interactive tutor system and should not to be confused with the MIDI status byte. Its applications will become apparent in the next section.
|
|||||||||||
| 5.2 the tutor system | ||||||||||||
|
In a similar way to typing tutors, we will introduce a tutor system into MIVI, for use with our piano instrument model. However, since MIVI is essentially its own host system, for different graphical instrument models, building such a tutor system into the core MIVI architecture makes it automatically available to any guest instrument. In the same way that VST provides a MIDI abstraction layer to MIVI, MIVI can provide an abstraction layer for the tutor functionality. In both cases, it is up to the respective guest objects – plugin or instrument model – whether they take advantage of the available information. So, although only the piano instrument model will take advantage of this new core functionality in our implementation, it will be readily available to the flute and any other instrument models, should subclass support appear in the future. The following paragraphs describe how the feature is hosted and handled by MIVI.
|
||||||||||||
|
5.2.1
designing the tutor system |
||||||||||||
|
Starting at the beginning, MIVI must educate the user as to the relationship between notes on the score and the pitch control mechanisms of the instrument – the keys, strings, finger positions, etc. This is simply achieved by presenting our visual representation of the instrument and manipulating the graphical model with respect to the configuration of the instrument given a particular note for input. This might be through the showing of key depression or highlighting, for example. |
||||||||||||
|
The next stage is to start playing phrases and pieces of music. In MIVI, it is a simple matter to make the MIDI input source a MIDI file. In the context of a piano, the combination of this functionality with the depression and highlights will lead to an appearance similar to that of a pianola. A crude, but apt, analogy of piano playing is that of typing, both involving potentially fast and complex fingering on a keyboard. The most popular method of learning to type is by working your way through the lessons of a typing tutor – a piece of software that presents passages of text and, using an onscreen representation of a computer keyboard, shows the user which key to press. Tutor systems are not a new development in music, and already exist in some entry-level home-keyboards [8]. Instead of a representation of the keyboard, these electronic instruments exploit their physical presence and adorn the keys themselves with the prompts – be it by lighting an LED adjacent to the key, or the key itself. As yet, though, no attempt has been made to port the feature to non-keyboard devices. Indeed, for many instruments, the instrument’s body does not present itself as an appropriate visual display device, for the player’s attention is usually fixed elsewhere. In the case of MIVI, attention rests on the computer screen, and disadvantages incurred by being apart from the actual instrument are, to an extent, balanced by the flexibility a computer-generated image can afford. On the screen, we can: highlight the keys with any hue of colour, depress them without interfering with the user’s similar endeavours on their own instrument, etc. – even bend, or break, the laws of the physical universe. Naturally, the system requires the user’s instrument to be MIDI compatible – a MIDI keyboard, in our case – so that our learner will be able to interact with the tutor, and both feedback and instruction can be given based on the user’s performance. |
||||||||||||
|
user interaction |
Ideally, as the note appears on the score, it will be denoted, in some way, on our visual representation as ‘expected’. At this point, MIVI could either wait until the corresponding note has been played on a connected MIDI-input device, before presenting the next note, or continue regardless, recording, or marking, the note as late or absent. With the first approach, which works in a similar fashion to a typing tutor, the user will be able to easily chart their progress as the music becomes more cohesive and harmonious. The second, however, has the added advantage of teaching ensemble skills. When in an ensemble, it is the leader, often a conductor, who will keep the rhythm, not the individual instrumentalist. Thus, performers will require the ability to either catch up or restart at some later point in the piece, in sync with fellow musicians.
|
|||||||||||
|
5.2.2
modelling interaction |
||||||||||||
|
In any case, our musical tutor will consist of different inputs, such as Note On messages from the score and the user, and different states, to denote when the tutor is waiting for a keystroke from the learner, when it is not and when the user is late in making a keystroke, etc. We can, therefore, model the process using a deterministic finite state automaton (DFSA). Given that each note is defined using two MIDI messages, there are two levels of strictness available to enforce on the learner, each corresponding to a level of skill. In the first, we teach the learner to simply hit the right keys, checking their mirroring of Note On messages. Once they have mastered that level, we can demand that they also mirror the Note Off messages, thus schooling the learner to hit the right notes, for the right amount of time. The second step largely involves performing the processing for first twice, once for Note On messages and once for Note Off messages.
|
||||||||||||
|
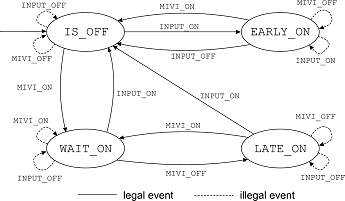
fig.
5.1 - DFSA for |
|
|||||||||||
|
The DFSA for the first step is illustrated in figure 5.1. Simply, the ellipses in the diagram represent the various states of each note in the tutor system. An event (transition), such as a MIDI message, will take the note from one state to another, and form the arcs of the diagram. The illustration employs the same terminolgy used in the code (code ref. 03). Finally, the machine is started in the IS_OFF initial state, denoted by the orphaned arc entering it with no origin and no event. If a Note On is received from a specific source, the next message to come from that source should be a Note Off. Such events adhering to this convention are marked as ‘legal’ in the diagram. However, there is always the possibility that communications interference, or program error might result in illegal events. Indeed, MIDI transmissions are very low bandwidth and seldom have any error-correction, so errors are possible and represent exceptions that should be handled. In this simple automaton, such events merely loop back on themselves, resulting in no change of state. As mentioned, once the learner has mastered the beginner skill level, they can move on to expert mode. The expert DFSA is, by definition, at least twice as complex, because we have to track twice as many states and take greater care of Note Off inputs.
|
||||||||||||
|
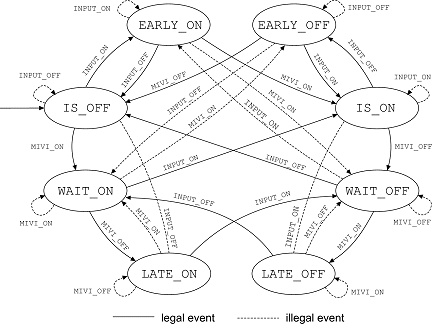
fig
5.2 - DFSA for |
|
|||||||||||
|
The diagram of the automaton, in figure 5.2, shows that, for the most part, working out the additional ‘legal’ events is simply a case of mirroring those already existing in the beginner DFSA – hence the symmetry. In our implementation, we maintain the policy of looping illegal events back on themselves. However, we could implement some exception handling for illegal events and potentially tolerate errors in transmission and event generation. When we receive two identical messages consecutively and from the same source, we can either assume, as we have been, that the message itself is an error and ignore it, or we can assume that we have missed a complimentary message in-between and simulate the missed occurrence of it, then the new message. Instead of doing two nextStatus lookups, we can hard-wire these eventualities into the automaton, simply by following the complimentary message’s arc, then the new one’s, and inserting this end state as the next state for the original illegal event. Such potential modifications are illustrated in figure 5.2.
|
||||||||||||
|
5.2.3
instructing the user |
||||||||||||
|
Now that code exists to handle the input and internal state of the tutor system, we need to promote this information to the display and give instruction to the learner. Given the state, we use simple colour-association (green is to go and safe as red is to stop and danger, etc.), in our implementation, with these straightforward rules… |
||||||||||||
Note that: (1) by ‘manipulate’ we mean either ‘depress’ or ‘release’, (2) rule 4 dictates that if the original piece of music states that the note should be depressed, it is displayed so (the learner has no influence over this aspect), and (3) rule 3 is equivalent to ‘if the user is early in manipulating a key, shade it red’. Thus, the learner can take a similar, simple approach to tackling the lesson…
Effort has been expended to deliberately make the above process as simple as possible, so as not to necessitate a complicated further stage in the learning process. The three steps listed are designed to be easily learnable (or discoverable, through trial and error, given the absence of instruction) and quickly adaptable as a sub-conscious activity – a consideration that does not require pro-active thought. It should also be noted that, depending on the track IO set-up of the host, the user should also be able to identify errors (in red) through the discordant or hesitantly timed sounds their inputs produce. |
||||||||||||
|
5.2.4
implementing the tutor system |
||||||||||||
|
Conceivably, the first approach to user interaction, mentioned in the closing paragraph of section 5.2.1, could be implemented by transmitting MIDI real-time control (RTC) messages (dictating changes in tempo) to the host, from the plugin. Thus, when the user’s performance slips, MIVI could even slow down and make it easier to catch up. Unfortunately, VST plugins are not given authority to control the host’s playback, and such messages are ignored. Thus, for the time being, we are resolved to concentrate our efforts on the latter approach. Interestingly, one of the canDo competences, mentioned in section 3.1.3, is "sendVstTimeInfo", so we can only assume support for this is destined for some future VST release. For now, however, to vary the difficulty, the user can manually alter the tempo of the piece, using the native playback controls of the host. As in traditional music education, the learner can start at a slow pace and, as they find their performance improving, gradually increase the tempo. A further failing of the current VST implementation is the lack of transparency relating to MIDI input devices. Although we will receive the messages from any device connected to this system, and are able to filter pitches, velocities and channels, there exists no way to differentiate between messages sent from connected input devices and those from the host itself. In MIDI, we note that, from one source, we should not receive two Note On messages without an intervening Note Off. Thus, introducing the learner’s input to the host’s, as in MIVI, we should receive…
Note On, Note On, Note Off, Note Off, Note On, etc.
…where the odd numbered events are the notes of the original piece of music (from the host) and the even numbered events are notes received from the attached MIDI device, as the user echoes what they see on the screen. However, a problem occurs when the user hits a wrong note. Without knowing the true source, the above approach will force MIVI to assume the note was actually from the original piece of music, and will treat it as such, by requesting another Note On from the user. Then, when the user realises their mistake and releases the key, MIVI will assume the user missed the note and mark it as late. In any case, to rectify the situation, the user will have to repeat their mistake and press the key again. We must assume any learner will make mistakes, as learners often do. Thus, the above implementation is likely to confuse the user and inhibit, rather than assist, the learning process. Therefore, to enable us to identify which source MIDI messages originate from, for our implementation, we will assume that user input will always arrive via MIDI Channel 16. Thus, before the tutor system will function, the user is required to execute the short, but complicated, procedure of adding a new track to the sequence and setting it to MIVI output on Channel 16. More practical source identification, such as that described, is also in the pipeline for native support in the next release of VST, and it is hoped that this will be available if, and before, MIVI were to be available to a wider audience. We mentioned earlier that simply switching a track’s output to MIVI would mute the track. In the case of the tutor system, this can be useful. We want the original music to be displayed and the learner’s input to be auralised. Indeed, hearing oneself play is sometimes the best criticism one can get when learning an instrument. Unfortunately, we need the user’s input to go to both MIVI and an audio output, so it is now necessary to perform the aforementioned corrective procedure on the user’s input channel, making it dual output. Conversely, to have the original track auralised, as well as the input track, the user can hear what is expected of them, and when attempting to repeat it, hear their attempt and judge its correctness themselves. |
||||||||||||
|
coding automata |
Happily, a DFSA is a simple affair to turn into efficient code. In the MIVI source code, we simply use the multi-dimensional array nextState – effectively a lookup table – of consequent states (code ref. 03), indexed by the current state and the event. Thus, simply supplying it with the current noteStatus and the newly arrived noteMsg will yield the next noteStatus. Our array nextStatus also has an extra dimension to reflect the two lookup tables, for beginner and expert skill levels, respectively. Below that, the array nextStateReward is defined. With exactly the same dimension as its namesake array, it represents a 1:1 mapping to it, representing rewards (or penalties if negative) earned as each state change occurs. The reader should be able to match rewards for correct and timely actions and penalties for false or late ones. In addition, the reader’s attention is directed towards the EARLY_ON state. Here, the learner has pressed a key, which, at the moment of pressing, was incorrect, and is penalised 4 points. However, as we receive a Note On from MIVI (a MIVI_ON), we assume the user was merely early and refund 2 of the subtracted points, as this is less of a crime than a wholly incorrect note. To give the score some meaning, the learner will also want to know the maximum number of points achievable at any point in their recital. Thus, depending on the skill level, we increment the noteCount variable when we receive a Note On, and potentially a Note Off, from the host. Later, the noteScore and noteCount variables are combined to present the learner with a percentage of points achieved out of those available (code ref. 23), which is displayed on the interface (section 5.3). It should, however, be noted that this percentage can become negative, because there is more potential, and higher cost, for error than potential, and reward, for accuracy. The lookups of these arrays are made by the function setNextState(), called during the processEvents() procedure (code ref. 30), after the incoming noteMsg has been identified. To do this, we inspect the incoming message, setting a flag if it is on Channel 16 – our input channel – and checking the message type. As mentioned in section 2.1.1, Note Off message’s can take two forms – an explicit Note Off or a Note On with zero velocity, and our code reflects this. This can be traced back to MIDI input devices, where velocity is continuously measured and despatched, as opposed to discretely measured and quantified, as with a MIDI sequencer. Returning to the notes array, introduced in section 5.1, the purpose of the status component should now be obvious. Here, we store the current state of the note, indexed in the array. A pointer to the current note and a copy of the incoming message is then passed to the setNextState procedure (code ref. 31). There, we use the three arrays, notes, nextState and nextStateReward, to set the appropriate next state of our note and return the score achieved, which, following the call’s return, is added to a global variable noteScore, representing the cumulative score of the lesson.
|
|||||||||||
|
5.2.5
eliciting feedback |
||||||||||||
|
Our implementation only gives the shallowest of feedback. MIVI could be extended to accumulate more detailed statistics, including counts of late or missed notes and average response times, displaying them to the user upon request or throughout playback, on the screen. |
||||||||||||
|
For example, when the user presses a key too early, a counter of early keystrokes could be incremented, and likewise for late keystrokes. At any point in the piece, by comparing the number of early keystrokes to late, MIVI can inform the user whether they are on average too soon or too late, and advise the need for more or less patience respectively. Even more involved statistics might give feedback on response characteristics dependent upon pitch. If, for example, the pianist is always late on notes with accidentals (sharps and flats), MIVI could advise practice in this area. With the introduction of fingering algorithms, the user could even be shown which fingers are, on average, not nimble enough. This area represents a field of research not currently in this project’s scope. Thus, the feedback in our implementation is kept to a level that demonstrates its use and integration with MIVI, but not its full potential. The reader is referred to E.R. Steinberg [47] for a more in depth discussion.
|
||||||||||||
| 5.3 the interface | ||||||||||||
|
In this section we discuss the tools provided to the user to configure and adapt the MIVI application to their personal needs and optimal learning environment – the graphic user interface (GUI).
|
||||||||||||
|
5.3.1
the MIVI learning environment |
||||||||||||
|
It is accepted that each person has a different optimum environment for different tasks such as working, learning and relaxing. In this section, a few simple provisions (many that have already been mentioned) can be easily implemented to help make the learner’s introduction to MIVI as effortless as possible, while aiding the ensuing learning process. |
||||||||||||
|
The first is the provision of rotation controls, which allows the user to take an interactive tour of the MIVI instrument, and thus discover keys, valves and other ornaments whose existence is not obvious from some angles. Additionally, it permits them to adjust the instrument to an orientation they can easily equate to their own real instrument. Such an orientation can vary from person to person, application to application and instrument to instrument. In addition to rotating, the user can zoom in on – or out from – the instrument. In combination with the ability, provided by the OS, to resize the OpenGL window, this allows the user to set the optimal size and detail (resolution) of the instrument, as it is presented to them. Automating a tour of the instrument, such as that alluded to earlier, is the job of the SPIN button. Although manual rotation should permit a degree of familiarisation with the instrument, a continually and smoothly changing aspect will lend a better acclimatisation with the 3D form of the object, partially reconciling the loss of information inherent in the 2D nature of the computer VDU. Throughout development, this display mode was used to get a feel for the burgeoning virtual model, at each stage, comparing it with the feeling furnished by the real instrument. Although far from being a scientific approach, this did lead the author to consider the instrument as a whole, in contrast to a collection of keys or 3D shapes. It is also a common opinion that the computer keyboard represents a more intuitive input device than clicking buttons with a pointing device, like a computer mouse. The implementation of rotational control using the cursor keys therefore follows as a better method. However, due to the provision of similar functionality in the host, over a potentially varying domain of keys (and hence, the conflicts and side-effects that could ensue from a single key stoke), VST plugins are not furnished with a built-in keyboard input handler. Naturally, such problems would also present themselves were GLUT’s own glutKeyboardFunc() to be used in lieu of similar native functionality. The application of the highlight, dependents-highlight and depress mode switches has largely been covered in previous sections. To this extent, the only thing left of remark, is their independence of each other, in that the activation of one does not affect that of the others. Although this allows for a wide range and flexibility of display methods, certain inane configurations, such as the sole highlighting of dependents, are possible. Thus, a future alternative would be to define a partial superset of display modes, restricted to those with useful applications, and give the user access to this set, as opposed to the core modes. |
||||||||||||
|
5.3.2
implementing the interface |
||||||||||||
|
Although our implementation is housed by Microsoft’s Windows™, we have made a policy to favour cross-platform compatibility where we can. Such has been the reasoning behind the choices of MIDI, OpenGL and even VST. Therefore, wishing to avoid obstacles in this respect, the use of the default Windows™ interface, housed in the Win32 Microsoft Foundation Classes (MFC), is not a good idea. |
||||||||||||
|
the VST GUI libraries |
Since an interface is a common, if not necessary, component of many VST plugins, Steinberg concluded that a sensible move would be to package such interface-creation code in the VST plugin architecture, theoretically making it available anywhere there is a VST host. The VST GUI libraries, as they have come to be known, are a collection of event handlers and controls, largely centred around the use of the universal standard of bitmapped images. The interface, as a whole, thus merely becomes a collage of bitmaps that can easily be displayed, in exactly the same way, on all platforms. To emulate effects such as button depression, a bitmap can contain a sub-pixel map – essentially an alternative bitmap to be shown during the depressed state. At the design stage, this merely involves doubling the height of the original bitmap’s canvas and painting the alternative image on the space gained in the new lower half. Throughout the report, we use the VST GUI control type COnOffButton, which – as the name suggests – is a two state toggleable button. On the rare occasion we want only a trigger (a single state push button), we still use COnOffButton, but specify the same sub-pixel map as the original bitmap, so no obvious change of state is evident to the user. We package the parameters for button creation in an array, and repeat the necessary code in an iterative loop (code ref. 25), thus saving repeated declarations of both the bitmap and button object and their respective assignments. Our images are stored as part of a C Resource file (.rc extension), which is simply a collection of bitmaps, icons, toolbars, HTML and other resources used in the development project. Their ordering in this file determines the integers (beginning at 128) used to enumerate the button bitmaps and events. To make this even clearer, we have defined an enumeration type to give each of the integers intuitive names (code ref. 05), and have used these names in the event handler. The event handler (code ref. 33) is simplistic, but practical. Instead of support for mouseover events and "drag and drop", the only supported event is a mouse click, upon which the listener function valueChanged() is called, with an integer handle as an argument identifying the control that was clicked. Inside this function, a conditional statement controls execution of the appropriate code for the event. This code is kept simple, to enable trouble-free execution and prompt return, and thus needs little explaining; analogue controls, such as zoom and rotation, merely increment or decrement their respective global variables for realisation during a later glDisplay() call, whereas digital controls simply toggle their respective global Boolean variables. The kButtonReset event results in a call to resetMIVI() (code ref. 17), which zeroes all the rotation and zoom variables, then, in turn, calls resetMIDI() (code ref. 16), which zeroes all the notes’ velocities and resets their statuses to IS_OFF. The kButtonTutor event toggles the TUTOR_MODE variable, resets the current score and also calls resetMIDI(). Finally, the kButtonSkill event adjusts the skill level of the tutor system. Although potentially encapsulated, in its current state, with a Boolean variable, the SKILL_LEVEL integer and its resulting switch statement will allow the easy addition of new skill levels, complementing the current beginner (0) and expert (1) modes.
|
|||||||||||
|
5.3.3
default plugin controls |
||||||||||||
|
A select number of standard interface controls are provided as default with all VST plugins. These include the controls to change program (or instrument, in our case). A left arrow, right arrow and drop-down list of available programs serve to this purpose. The VST host, itself, handles the events generated by these controls, which results in the calling of the MIVI::setProgram() (code ref. 19). Here, the current MIVIInstrument object is deleted and replaced with the one of the type identified by the program integer. Note that, again, we have enumerated this integer to a more intuitive textual notation, including PIANO_MODEL_88_KEY, FLUTE_MODEL, etc. Additionally, on this panel, an LED-styled button exists to activate and deactivate the plugin, controlling its integration into the current VST song and working environment. The name of the plugin, ‘MIVI’, as specified in the plugin’s dynamic link library definition file (mivi.def), also appears here. The last control on the plugin’s default panel is that of a file menu, allowing the loading and saving of banks and instruments. Although no saving of parameters has been implemented, at this stage, brief reflection should be shed in this direction, which we do in the next section.
|
||||||||||||
| 5.4 preserving the environment | ||||||||||||
|
As much an aid to streamlining music education that MIVI could ever be, it is naïve to presume that the user can acquire all the available knowledge in one sitting. Having optimised their learning environment on the first sitting, it is counter-productive to force the user to repeat this on the next. Hence, the program configuration of MIVI should be stored between calls. With VST, there are immediately two methods available to us. A normal effect plugin will most often be used in the composition of a song, and the composer will demand the same persistence of settings between each composing session. Hence, VST offers a plugin the opportunity for its settings to be saved in the song’s own file (.all extension in Cubase). To achieve this, all the plugin must do is register the required settings with the VST host and inform it of the current value, as and when it changes. The host, then, has enough information to perform the save process. |
||||||||||||
|
MIVI file format |
One added benefit of registering parameters with the host is that they can be automated by MIDI messages embedded in the song. Although we cannot expect the user to know how to embed such messages, it would allow the founding of an almost proprietary MIVI song file format – songs that have been pre-configured and optimised for use with the MIVI plugin. The configurations to control auralisation and transmission of MIDI to MIVI, for each track, could be additionally pre-established. Such songs would be as easy to distribute as MIDI files (over the internet, for example) and could also form a record of progress, as the user saves the state of the song after each lesson, to recommence upon successive loads. Feedback statistics could then be restored at each session, and thus give song-specific performance feedback, such as the quantative strengths and weaknesses of the learner’s performance at various bars and phrases in the piece. The second method is somewhat more involved, and employs the aforementioned file menu. VST can provide the plugin with a byte stream, so that the plugin can transmit and receive ‘chunks’ of arbitrary data to and from the host. The file menu allows the user to create and select external files (.fxp extension) for VST to place this data in. Aside from this common dialog interface and proprietary ‘chunk’ data format, this save method is not far removed from normal data IO streams available to most programming languages. However, by establishing these two requirements, VST allows you to write platform-independent code – it is now up to the host to translate the ‘chunk’ to the OS’s native word size and present the user with a file selector tailored to the OS’s path and file structure. |
|||||||||||
![]()
All content,
including code and media, (c) Copyright 2002 Chris Nash.